

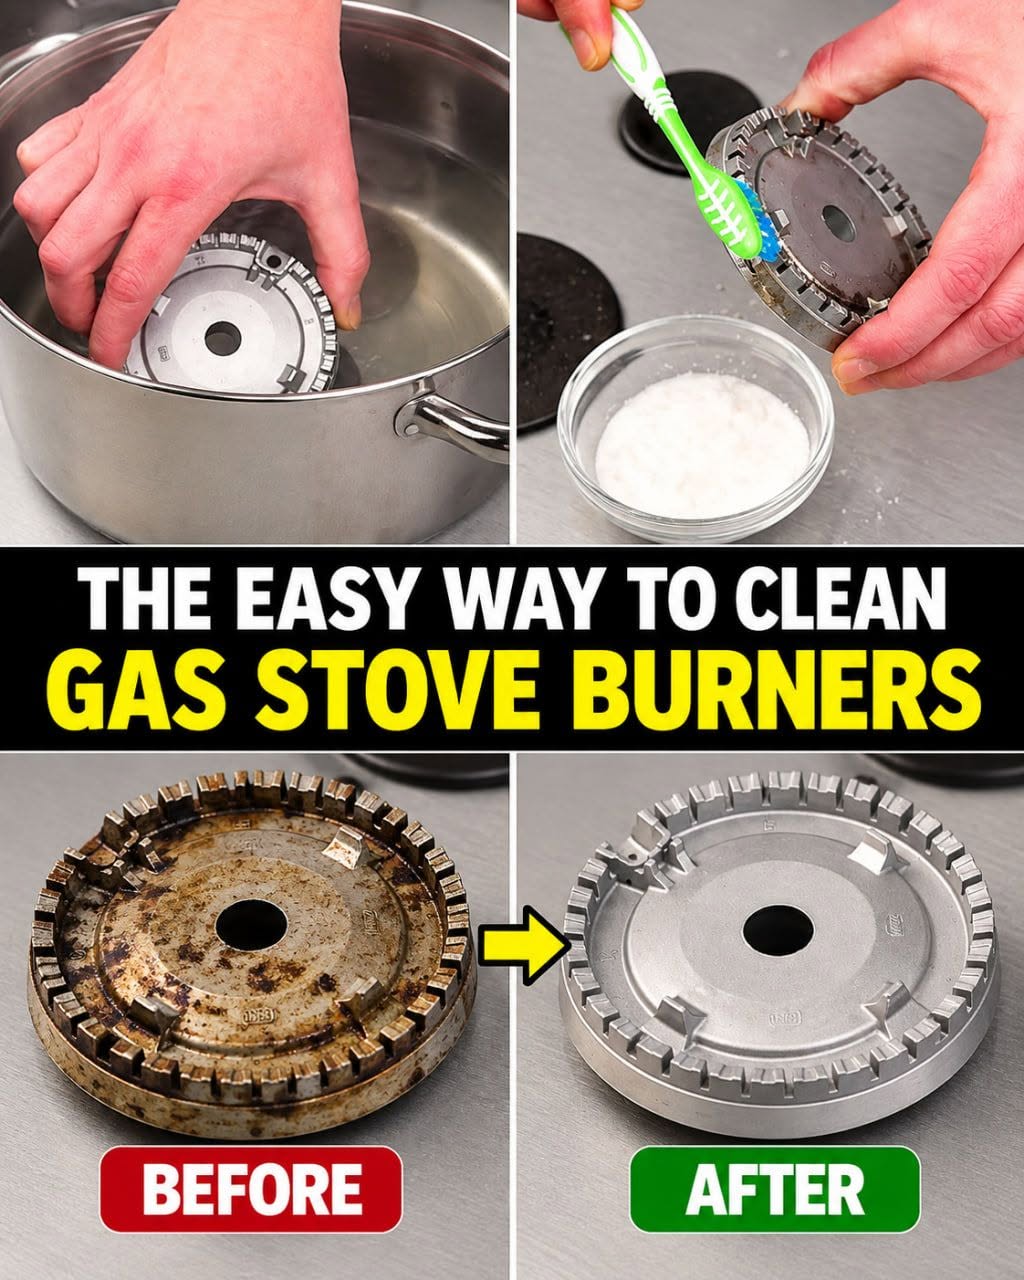
Gas stove burners can quickly collect grease, food splatters, crumbs, and stubborn burnt-on residue. Even when the rest of the kitchen looks spotless, dirty burner caps can make the entire stovetop look neglected.
The useful part is that you may not need an expensive specialty cleaner. Two familiar household ingredients—white distilled vinegar and baking soda—can help loosen everyday buildup when they are used correctly and when they are compatible with your particular stove.
The trick is not simply mixing everything together. Vinegar works well during the loosening and soaking stage, while baking soda can be used afterward as a mild abrasive for stubborn residue.
Why Gas Stove Burners Become So Dirty
Burners sit directly underneath pots and pans, so they are exposed to almost everything that happens during cooking. Oil splashes during frying, sauces boil over, crumbs fall beneath the grates, and small amounts of food can become baked onto hot metal.
Fresh spills are usually easy to wipe away. The problem begins when they are heated repeatedly. Each cooking session can make old residue harder and more difficult to remove.
That is why occasional deeper cleaning can make such a noticeable difference.
The Two Simple Ingredients
For this cleaning method, the main ingredients are:
1. White distilled vinegar
2. Baking soda
You will also need warm or hot water, an old toothbrush or another small soft brush, a heat-safe bowl or pot, and a clean microfiber cloth.
Before beginning, check the cleaning instructions supplied with your stove. Burner materials and coatings vary, and not every removable component is designed to be soaked or exposed to acidic cleaners.
Step 1: Make Sure Everything Is Completely Cool
Turn all burners off and wait until the stovetop, grates, burner heads, and caps are completely cool.
Never remove or clean burner components while they are hot.
If the manufacturer recommends shutting off the gas supply before removing burner components, follow those instructions.
Step 2: Remove the Burner Parts Carefully
Remove the grates and detachable burner components according to your appliance manual.
If your stove has several different burner sizes, consider taking a quick photograph before removing them. This provides an easy reference when you put everything back together.
Do not force a component that does not lift away easily. Some stove designs use different attachment systems.
Step 3: Use the Vinegar Soak
Place compatible removable burner components in a heat-safe bowl or pot containing warm or hot water.
Add approximately 50 milliliters, or around 3 tablespoons, of white distilled vinegar.
Allow the approved components to soak for approximately one hour.
This gives the water and vinegar time to soften some of the grease, mineral deposits, and cooked-on food residue.
Remember that the objective is to loosen the grime rather than magically dissolve every stain. Heavily neglected burners may require another cleaning session.
Once the softened residue starts lifting, the second ingredient becomes especially useful.
Step 4: Bring In the Baking Soda
Remove the burner components from the soaking solution.
Instead of mixing a large quantity of vinegar and baking soda together beforehand, use a small amount of baking soda directly on stubborn areas after soaking.
Baking soda is mildly abrasive, which means it can provide additional scrubbing action without automatically requiring an aggressive scouring pad.
It is still important to be careful. Painted, coated, polished, or otherwise delicate components may require a gentler cleaning method.
Step 5: Scrub Gently With a Toothbrush
An old toothbrush is particularly useful because its small bristles can reach narrow edges and grooves.
Gently scrub the areas where grease and cooked-on food remain.
Give stubborn areas additional time rather than immediately reaching for a sharp scraper.
Do not aggressively force pins, knives, toothpicks, or other objects into burner openings. Burner ports are designed to distribute gas in a particular pattern, and pushing debris deeper into them can create additional problems.
If burner ports appear blocked, use the cleaning procedure recommended by the appliance manufacturer.
Step 6: Rinse Away the Residue
If the manufacturer’s instructions permit rinsing, wash the removable components with clean water until vinegar, baking soda, and loosened debris have been removed.
Inspect grooves and edges for particles that may remain trapped.
Step 7: Dry Everything Completely
This step should not be rushed.
Use a clean microfiber cloth to remove surface moisture, then leave the components to air-dry until they are completely dry.
Moisture around burner components or ignition areas can interfere with normal ignition. Reinstalling damp components is therefore a common cleaning mistake. :contentReference[oaicite:0]{index=0}
Clean the Stovetop While the Burners Are Removed
With the removable components out of the way, this is an ideal opportunity to clean the normally hidden areas of the stovetop.
Remove loose crumbs first. Then use a slightly damp microfiber cloth with a suitable cleaner or a small amount of mild dishwashing liquid if compatible with the surface.
Avoid flooding the fixed burner area with water. Gas stoves can contain ignition electrodes and other components that should not be soaked.
Be Gentle Around the Igniter
The ignition electrode deserves particular care.
Avoid soaking it or saturating the surrounding area. If residue has accumulated nearby, use a lightly dampened cloth or follow the cleaning method specified by the manufacturer.
Everything should be dry before you attempt to ignite the burner again.
What About the Grates?
Gas stove grates can accumulate substantial amounts of grease.
If your manufacturer allows them to be washed, remove them once they are completely cool and clean them with warm water and dishwashing liquid.
A non-scratch brush or sponge can help remove stubborn deposits.
Rinse and dry them completely before returning them to the stove.
Don’t Mix Vinegar and Baking Soda in Advance
You have probably seen cleaning videos where vinegar and baking soda are mixed together because the combination produces dramatic bubbling.
The bubbles look impressive, but the ingredients chemically neutralize one another as they react.
For this method, it makes more sense to let vinegar assist during the soaking stage and then use baking soda separately for mild abrasive scrubbing. :contentReference[oaicite:1]{index=1}
Never Mix Vinegar With Bleach
This is an important safety rule.
Do not combine vinegar with bleach. The combination can release hazardous chlorine gas. Avoid experimenting with mixtures involving bleach, ammonia, acidic cleaners, or other strong household chemicals. :contentReference[oaicite:2]{index=2}
Step 8: Put the Burners Back Correctly
Once every component is completely dry, reinstall the burner heads and caps in their correct positions.
The pieces should sit securely and evenly. An incorrectly positioned burner cap can interfere with normal flame distribution.
This is where the photograph you took before disassembly can be useful.
The burner may now look dramatically cleaner, but one final check matters before you return to normal cooking.
Step 9: Check the Burner
After everything has been correctly reassembled and dried, operate the burner according to the manufacturer’s instructions.
The flame should normally appear stable and reasonably even around the burner.
If the burner fails to ignite normally after cleaning, turn it off rather than repeatedly attempting ignition.
Check whether the components are completely dry and correctly positioned.
If problems continue, consult the appliance manufacturer’s troubleshooting instructions or contact a qualified technician.
Why a Burner May Click After Cleaning
If an electric igniter continues clicking after cleaning, residual moisture may be present around the ignition area.
Turn the controls off and give the appliance additional time to dry.
If clicking continues after everything is completely dry, consult the manufacturer or an appropriate appliance professional.
What If the Flame Looks Unusual?
Temporary flame-color changes can sometimes occur because of moisture, airborne particles, contaminants, or cleaning residue.
Persistent unusual flame behavior should not simply be ignored.
Make sure the burner is clean, dry, and correctly assembled. If the problem continues, follow the manufacturer’s guidance and arrange professional inspection when appropriate.
Common Cleaning Mistakes
One common mistake is cleaning burners before they have cooled completely.
Another is soaking components that the manufacturer specifies should remain dry.
Avoid aggressive metal scraping, especially around small burner openings. Sharp tools can damage components or push debris farther into burner ports.
Steel wool and highly abrasive cleaning powders can also scratch certain finishes. Once a surface becomes scratched, grease may become even more difficult to remove later.
How to Handle Very Stubborn Grease
Old, heavily baked-on grease may not disappear after one attempt.
Instead of immediately using aggressive scraping tools, repeat an appropriate soaking process and give the residue additional time to soften.
For stubborn buildup on the stovetop itself, choose a product specifically approved for that surface.
Different Stovetop Materials Need Different Care
Stainless steel: Use soft cloths and avoid aggressive scouring pads. Wiping with the visible grain can also help maintain its appearance.
Glass: Glass cooking surfaces can scratch, so use products and tools specifically intended for glass stovetops.
Enamel: Enamel is generally durable but can chip or become damaged through aggressive scraping. Softening hardened food before removal is usually preferable.
The Easiest Way to Prevent Heavy Buildup
The easiest grease to remove is fresh grease.
After cooking, wait until the stove is completely cool and wipe away new splashes and crumbs.
This prevents residue from being heated repeatedly until it becomes dark, hard, and difficult to remove.
Also try to clean boil-overs relatively soon after they happen. Sauces, milk, pasta water, soups, and sugary foods can leave increasingly stubborn deposits after repeated heating.
A Simple Weekly Routine
Once the stovetop has cooled, wipe it with a damp microfiber cloth and inspect the burner caps for fresh spills.
Look underneath the grates and around burner areas for hidden crumbs.
If the stove has seen particularly heavy use, clean removable components according to the manufacturer’s recommendations.
A few minutes of routine maintenance can prevent the type of buildup that eventually requires extensive scrubbing.
Frequently Asked Questions
Can Gas Burners Be Soaked Overnight?
Only do this if the appliance manufacturer specifically says prolonged soaking is acceptable. Some metals, coatings, and finishes can be affected by extended exposure to water or acidic solutions.
Can Gas Burners Go in the Dishwasher?
Do not automatically assume they are dishwasher-safe. Certain burner finishes may discolor or corrode. Check your appliance manual first.
Can White Vinegar Be Used on Every Stove?
No. Materials differ between appliances. Confirm that vinegar is suitable for your particular removable components and stovetop finish.
Why Is the Flame Uneven After Cleaning?
Possible explanations include a burner cap that is not seated properly, components that remain damp, or debris around burner openings.
Turn the burner off, allow everything to cool, and check the assembly against the manufacturer’s instructions.
Can I Use Dish Soap?
Mild dishwashing liquid is commonly useful for kitchen grease, but compatibility still depends on the appliance. Removable parts should be thoroughly rinsed and dried when washing is permitted.
Is Baking Soda Safe for Every Burner?
Not necessarily. Baking soda is mildly abrasive. Some painted, coated, polished, or delicate surfaces may require a gentler product.
Final Thoughts
Cleaning gas stove burners does not have to involve complicated products. When compatible with your appliance, white distilled vinegar can help loosen residue during soaking, while baking soda can provide mild abrasive action afterward.
The biggest difference often comes from the simple details: letting residue soften, scrubbing gently, keeping fixed ignition components from becoming saturated, and allowing every removable part to dry completely before reassembly.
Most importantly, always follow the cleaning instructions for your specific stove. Different burner materials, finishes, and ignition systems require different care.
With regular wiping and an occasional deeper clean, stubborn buildup becomes much easier to manage—and your gas stovetop can stay cleaner without turning every cleaning session into a major chore.
← Previous Page