
very family seems to have that one person who can bring the simplest dessert to a gathering and somehow have everyone asking for the recipe.
In my family, that person is Susan.
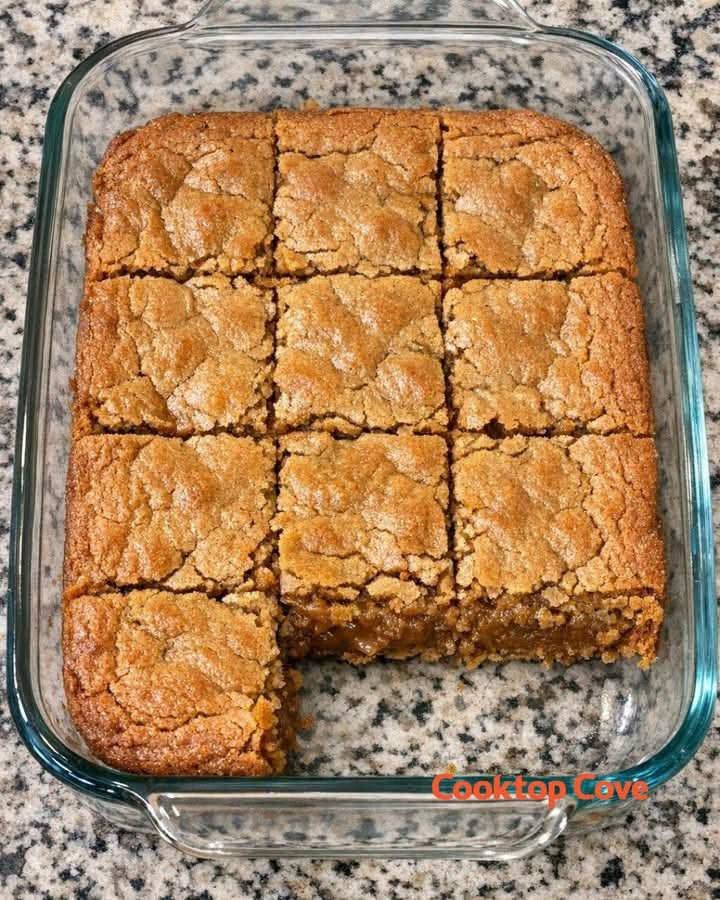
Whenever there’s a school bake sale, church gathering, neighborhood party, or family get-together, Susan makes the same easy 3-ingredient treat. She never fusses with complicated recipes, fancy decorations, or a long grocery list. She simply mixes three ingredients together, bakes them until golden, and somehow the entire pan disappears.
For the longest time, I wondered what made them so irresistible.
Eventually, I finally got her secret.
And honestly? It couldn’t be easier.
The 3 Ingredients
You only need:
- 1 box yellow cake mix
- 1 can crushed pineapple in juice, undrained (about 20 ounces)
- 1 cup shredded sweetened coconut
That’s it.
No eggs. No oil. No mixer. No frosting.
The pineapple provides moisture and plenty of fruity flavor, while the cake mix creates a soft, tender base. Coconut adds a little chewiness and a deliciously sweet, tropical finish.
How to Make Susan’s Easy Bake Sale Bars
1. Prepare the Oven
Preheat your oven to 350°F (175°C).
Lightly grease a 9-by-13-inch baking pan. For easier removal, you can line it with parchment paper and leave a little overhang on the sides.
2. Mix Everything Together
Pour the yellow cake mix into a large bowl.
Add the entire can of crushed pineapple, including the juice.
Stir in the shredded coconut.
Mix everything together until there are no obvious dry pockets of cake mix.
The batter will be thick. That’s completely normal.
3. Spread Into the Pan
Transfer the mixture to your prepared pan.
Because the batter is quite thick, use a spatula or the back of a spoon to gently spread it into an even layer.
Try to get it all the way into the corners so the bars bake evenly.
4. Bake
Place the pan in the oven and bake for approximately 25–35 minutes.
The top should look lightly golden, and the center should be set.
Because ovens vary, begin checking toward the earlier end of the baking time.
5. Cool Before Cutting
Let the bars cool in the pan before slicing.
They’re soft when warm, so giving them time to cool helps them firm up and makes them much easier to cut into neat squares.
For a bake sale, cut them into small, generous-looking pieces and arrange them on a serving tray or package them individually.
Susan’s Secret: Don’t Drain the Pineapple
This is the detail that makes the recipe work.
Keep the pineapple juice.
Since the recipe doesn’t contain eggs, milk, or oil, the liquid from the pineapple provides much of the moisture needed to turn the dry cake mix into a thick batter.
If you drain the pineapple, the mixture may become too dry.
That’s why Susan always reaches for the can and pours everything into the bowl.
Why These Disappear So Fast
There’s something magical about a dessert that’s both incredibly simple and incredibly satisfying.
These bars have:
A soft, tender texture
Sweet pineapple flavor
Chewy coconut
A lightly golden top
A wonderful tropical aroma
They’re also easy to eat without utensils, which makes them especially convenient for bake sales, potlucks, and parties.
And because they’re made in one bowl, there’s hardly any cleanup afterward.
Easy Ways to Dress Them Up
Susan keeps hers simple, but you can add a little something extra if you’re making them for a special occasion.
Add a Powdered Sugar Dusting
Once the bars have completely cooled, lightly sift powdered sugar over the top.
Make a Simple Glaze
Mix powdered sugar with a tiny amount of milk or pineapple juice and drizzle it over the cooled bars.
Add Toasted Coconut
Toast a little extra coconut separately and sprinkle it over the top after baking.
Serve With Whipped Cream
For dessert at home, warm a square slightly and serve it with a spoonful of whipped cream.
Add Nuts
Chopped pecans or macadamia nuts make a delicious addition if your family enjoys nuts.
These extras aren’t necessary—the original three-ingredient version is delicious on its own.
Tips for Perfect Pineapple Bars
Use Undrained Pineapple
The juice is essential to the texture.
Don’t Overmix
Stir just until everything is combined. There’s no need to beat the batter.
Spread It Evenly
The mixture is thick, so take your time spreading it across the pan.
Let It Cool
The bars become easier to handle and slice as they cool.
Don’t Overbake
You want a soft, moist center rather than dry, crumbly bars.
Can I Use a Different Cake Mix?
Absolutely.
Yellow cake mix is the classic choice, but white cake mix can also work well.
A coconut or pineapple-flavored cake mix could create an even more tropical dessert, although the flavor and texture may vary depending on the brand.
Can I Use Fresh Pineapple?
For this particular shortcut recipe, canned crushed pineapple is the easiest and most reliable choice.
Fresh pineapple has a different moisture content, so replacing the canned pineapple directly can change the consistency of the batter.
If you want the classic Susan-style bars, stick with canned crushed pineapple in juice.
How to Store Them
Once completely cooled, place the bars in an airtight container.
They can be stored at room temperature for a short period if they’re plain and the environment is cool.
For longer storage, refrigerate them in an airtight container.
If you’re preparing them for a bake sale, make sure they’re fully cooled before packaging to prevent condensation from making the bars soggy.
Can You Freeze Them?
Yes.
Cut the cooled bars into individual portions and wrap them well before placing them in a freezer-safe container.
Thaw them at room temperature or in the refrigerator.
For the best texture, allow refrigerated bars to come closer to room temperature before serving.
Frequently Asked Questions
Do I need to add eggs to the cake mix?
No. This recipe is specifically designed to use only three ingredients: cake mix, undrained crushed pineapple, and coconut.
Do I need to add oil?
No. The pineapple provides the moisture needed for the simple batter.
Why is my mixture so thick?
That’s normal. This isn’t a traditional cake batter. The mixture should be thick enough that you need a spatula to spread it into the pan.
Can I leave out the coconut?
Yes, although the texture and flavor will be different. If you omit it, you may want to slightly adjust the baking time because the mixture will have a different consistency.
Can I make these ahead for a bake sale?
Definitely. They’re a great make-ahead dessert. Allow them to cool completely, cut them into portions, and store them in an airtight container until you’re ready to package or serve them.
The Bake Sale Recipe I’ll Be Making Again
Now I understand why Susan has been making these for years.
There’s something incredibly satisfying about a recipe that requires almost no effort but still produces a pan full of treats that people can’t resist.
Three ingredients. One bowl. One pan.
And then comes the hardest part: trying to save a few pieces before everyone else gets to them.
Whether you’re preparing treats for a school bake sale, bringing dessert to a potluck, or simply want an easy homemade sweet for the family, these pineapple coconut bars are worth keeping in your recipe box.
Just don’t forget Susan’s one important rule: don’t drain the pineapple. That’s the little trick that helps make these simple bars so soft, moist, and delicious.